
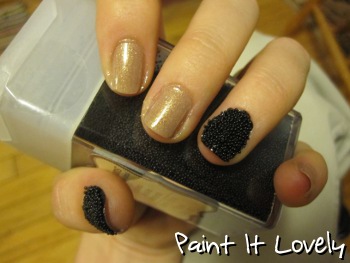
One of the latest trends in nail art is the Caviar manicure. The nail polish brand Ciate has announced the release of a kit containing everything you need to achieve this look. However, that kit comes with a hefty price tag of $25. That's pretty pricey, considering this look may not be for everyone - I honestly wasn't sure how I'd feel about it once I was wearing - and the fact that there is supposedly a waiting list for the before mentioned kit. Yikes!
The reason I say "yikes" is because I got the same look for $3.99, not counting the cost of polish which I already had. That's a big savings from the name brand kit, huh? The only thing I had to buy new were microbeads...which by the way are not the same as seed beads. More on that later.
I really like the look of this manicure, and there are so many different things you could do with it. For this tutorial I decided to do something matching the name "Caviar". Now, I've never had caviar - and I have no desire to try it. The one time I tried champagne I was not impressed at all...I'd rank it as one of the worst tasting things I've ever had. But, supposedly the two go well together...supposedly.
Let's get to it!

Supplies:
I specifically used:
As always, paint on your clear base coat.
Next, paint your ring fingers and thumbs one coat of the black polish. Paint your other nails the champagne color. Depending on your polish, it may take more than one coat; mine took two. Let your nails dry.
 Once your nails have dried it is time to sprinkle on those microbeads. You are going to want to do this one nail at a time. The nail polish MUST be wet in order for the microbeads to stick to the polish. Repaint your first black nail, hold it over the paper bowl/plate, and sprinkle the beads over the top of the wet polish. Rotate your nail so that you get the beads on all sides. Gently press down on the beads to embed them into the polish better.
 Repeat this for each of the other black polished nails. If you'd like you can paint over the beads with a clear top coat. I would do a thin coat because you don't want to get dried globs of polish on the beads.
 Looks a lot like caviar, right? I have a feeling that this 3D manicure isn't too practical. I've only been wearing it for 15 minutes though and it still looks great. That may change by the time I wake up - I'll keep track of how long it lasts and post an update when I have a better idea.
I would love to see any recreations of this design, or if you tried something different. The next time I try this I want to use microbeads in a variety of colors over pink polish. Ice cream and sprinkles anyone?

read more
The reason I say "yikes" is because I got the same look for $3.99, not counting the cost of polish which I already had. That's a big savings from the name brand kit, huh? The only thing I had to buy new were microbeads...which by the way are not the same as seed beads. More on that later.
I really like the look of this manicure, and there are so many different things you could do with it. For this tutorial I decided to do something matching the name "Caviar". Now, I've never had caviar - and I have no desire to try it. The one time I tried champagne I was not impressed at all...I'd rank it as one of the worst tasting things I've ever had. But, supposedly the two go well together...supposedly.
Let's get to it!

Supplies:
- clear base & top coat polishes
- black polish
- champagne colored polish
- black microbeads
- paper bowl or plate
I specifically used:
- Finger Paints "Black Expressionism"
- China Glaze "Fast Track"
- Recollections black microbeads
 |
| Microbeads vs. Seed Beads |


I would love to see any recreations of this design, or if you tried something different. The next time I try this I want to use microbeads in a variety of colors over pink polish. Ice cream and sprinkles anyone?


