Showing posts with label nail. Show all posts

Thursday, October 11, 2012

Lace Overlay

This is an awesome, and pretty sexy, look that it really easy to accomplish. I made these nails for my little sister to wear to her Homecoming Dance. I was so excited to do these! Her dress was black lace and her heels were black with a little gold. These were perfect!

The nice thing with this design is that there can be so many different looks. You can change the base color, the lace color, and the lace pattern. For this manicure I used Finger Paint's "Key to my Art" as the base color. It's a really shimmery gold and looks lovely with the black against it. I got the lace for pretty cheap at Joann's Fabric Store (especially using that 40% off coupon).

What you'll need:
  • base color
  • clear polish
  • lace
  • scissors
 In preparation for this manicure, I cut 10 small strips of lace that were wide enough to cover the whole nail.

The first step is to paint all of your nails with your base color. These pictures show the nails glued onto a wooden dowel because I was painting a set of fake nails for my sister.
In order to get the lace to stick to your nails you'll need to put a coat of clear polish over your colored polish. While the clear polish is still wet, place a strip of lace over your nail. Gently press it down with the tip of your finger. It's okay if it smudges the clear polish a little bit - you're going to paint another couple of clear coats over the top of the lace to smooth things out.
The final step is to use your scissors to cut the excess lace from around your nails. Take your time and be careful on this step. It is easier if you use small scissors - nail scissors are perfect!

Voila! You've got a lovely manicure that didn't take forever to achieve a detailed look (and that took no artistic talent at all).
read more

Saturday, September 1, 2012

The Wonderful Wizard of Oz

I'd have to say that this is the most elaborate design I've done. Not that it was particularly difficult, but that it is technically five designs and took quite a bit of time.

I've always been a big Wizard of Oz fan...always. I love the movie, have the Barbie versions of Dorothy and her friends, a quilt, and let's just say that if I had it my way when I was younger my sister would have been named Dorothy (I was out voted...).

Anyways, for some reason I decided to use that movie as the theme for my nails this week. It was a pretty popular design. There were a lot of different ideas that I had, but I decided to go with pretty recognizable motifs from the movie.

If you're going to recreate this look here is what you'll need:
  • two yellow polishes (one darker than the other)
  •  black polish
  • white polish
  • red polish
  • red glitter polish
  • light blue polish or striper
  • silver polish
  • striping brush
  • fine point sharpie (this part is definitely optional)
  • acetone or nail polish remover
Polishes I used:
  • Sally Hansen "Lightening"
  • SoEasy Gold Striper
  • Finger Paints "Paper Mache"
  • Finger Paints "Black Expressionism"
  • CQ "Rouge"
  • Finger Paints "Romanticism Ruby"
  • SoEasy Light Blue Striper
  • Nina Ultra Pro "Smoke-n-Mirrors"

To start off, paint your thumbs yellow.
Once the yellow polish has dried, use your striping brush and the darker yellow polishes to create brick lines. Basically, draw a few vertical lines then stagger small horizontal connector lines. This will be your yellow brick road.
 Next, paint your index (aka "pointer") and ring fingers white. Let those dry. We're going to paint those index fingers first. Using that striping brush, which you cleaned off with acetone, paint horizontal black lines over the white polish - this gives you the Wicked Witch of the East's socks.
Your middle fingers are going to be painted as if they are the ruby red slippers. First, paint on that plain red polish.
After it has dried, paint the red glitter polish on. You can't really tell here - but this is glittery.
 Your ring fingers are going to be painted up like Dorothy's dress. Using that cleaned up striping brush and the light blue polish, paint a grid of thin lines over the white polish on your ring fingers.
Finally, your pinkies are going to be the Tin Man's chest. Paint on your silver polish first.
Use your striping brush and black polish to paint a vertical line down the center of the silver polish. You can also use the tip of the striping brush to put three small dots for rivets.
Clean up your striping brush. We're going to use it along with that red polish to paint a small heart on the left side of the vertical line. After all, the Tin Man wanted a heart.
There you have it. A Wonderful Wizard of Oz manicure!
Thumb to Pinky: Yellow Brick Road, Witch's socks, Ruby Slippers, Dorothy's dress, Tin Man
If you opted to use that fine point sharpie here is where it comes in. You can use it to write on the yellow brick road. I wrote "No place like home..." on my thumb nail. It was tricky and I recommend clear polish over the sharpie...otherwise it rubs off. Turns out sharpies aren't' permanent on nail polish.


read more

Friday, August 17, 2012

Mod Dots

This week one of my friends, Jessica (check out her Etsy store!), posted this picture on my Facebook wall. I thought it was a really cute design and wanted to try it out myself.
It's really simple and quick! Here's what you'll need:
  • clear polish
  • gray polish
  • black polish
  • blue polish
  • yellow polish
  • toothpicks or a dotting tool
  • paper plate or scrap paper
If you've been following along with the blog, you know what to do first. Paint on that clear base coat.

Next paint on one or two coats, depending on your polish, of your gray polish. Orly's "Faint of Heart" took two coats to get it where you couldn't see any streaks.
Orly's "Faint of Heart"
You'll be using your piece of paper or paper bowl as a palette. Put a dot or two of the black polish on your palette. Dip a toothpick into the polish and add a few dots, anywhere from four to seven, to the side of each nail. Make sure that they are all on the same side of your nails. Like this...
Finger Paints "Black Expressionism"
Place some blue polish on your palette. Using a new toothpick, do the same thing with your blue polish, only dab on fewer dots. Layer the blue dots on over the black dots.
Santee "Neon Sapphire"
Add some yellow polish to your palette. Use the smaller end of your toothpick to add a few yellow dots to each of your nails. The brighter the better. The yellow really pops against the darker colors.
Sally Hansen "Lightening"
 All that's left to do is paint on that clear top coat. I love how simple this design is and think it would look great with neon colors too. Have fun and try different color combos! Post your designs on the Facebook page!
read more

Wednesday, August 15, 2012

French with a Twist(er)

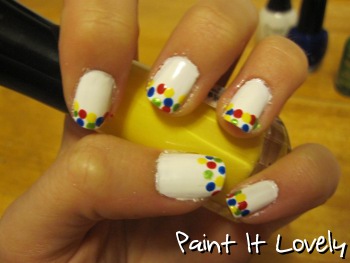
Earlier this week I was watching That 70's Show (love that show!) on NetFlix; in the episode I was watching Leo mentioned the game Twister. I thought this would be a fun twist on a french tip manicure, or it would look cute as a full nail design. The nice thing about it is that it's soooo easy!


For this design you are going to need:
  • clear coat (for the base and top coats)
  • white polish
  • red polish
  • blue polish
  • yellow polish
  • green polish
  • toothpicks (one for each color if possible) or a dotting tool
  • a palette (paper plate, piece of paper, etc.)

The polishes I used were:
  • Finger Paints "Paper Mache"
  • Santee "Neon Sapphire"
  • Wet n' Wild "Sage in the City"
  • CQ "Rouge"
  • Sally Hansen Insta-Dri "Lightening"
First things first - paint on that clear base coat. This will help protect your nails from staining.

Next, paint all of your nails white. Depending on your polish it may take more than one coat. I did two so that the polish was opaque (not see through).
The toothpicks I used are pointy on one end and blunt on the other. The blunt end makes a perfect dotting tool. If your toothpicks aren't make like this here is a secret. Dip the tip of the toothpick in a polish, then let it dry. Do this a couple of times until you get a bead of polish built up to the size you would like your dots to be.

I decided to do only a couple dots at a time of each color - that way the dots looked more random and layered. However, you could do all the blue dots at once, then the red, and so on. Also, I only did the tips of my nails. It was cute, but feel free to get creative!

Use your scrap paper or paper plate as a palette for your nail polish. I would only put a little bit on of each color at a time. That way it doesn't dry out and a bunch of polish goes to waste.  Like I said before, I alternated colors. The following pictures show how the look progressed. You can use any order of colors though.
That's it! It's simple, and it's quick! Paint on your top coat and you're good to go!


read more

Thursday, August 9, 2012

Champagne & Caviar

One of the latest trends in nail art is the Caviar manicure. The nail polish brand Ciate has announced the release of a kit containing everything you need to achieve this look. However, that kit comes with a hefty price tag of $25. That's pretty pricey, considering this look may not be for everyone - I honestly wasn't sure how I'd feel about it once I was wearing - and the fact that there is supposedly a waiting list for the before mentioned kit. Yikes!

The reason I say "yikes" is because I got the same look for $3.99, not counting the cost of polish which I already had. That's a big savings from the name brand kit, huh? The only thing I had to buy new were microbeads...which by the way are not the same as seed beads. More on that later.

I really like the look of this manicure, and there are so many different things you could do with it. For this tutorial I decided to do something matching the name "Caviar". Now, I've never had caviar - and I have no desire to try it. The one time I tried champagne I was not impressed at all...I'd rank it as one of the worst tasting things I've ever had. But, supposedly the two go well together...supposedly.

Let's get to it!

Supplies:
  • clear base & top coat polishes
  • black polish
  • champagne colored polish
  • black microbeads
  • paper bowl or plate


I specifically used:
  •  Finger Paints "Black Expressionism"
  • China Glaze "Fast Track"
  • Recollections black microbeads
Again, microbeads are not the same as seed beads. Crafty people may already know this - I did not. Microbeads are not found in the jewelry section of the craft store...they are found in the scrapbooking section. Apparently they are a page "embellishment". So, don't get the seed beads because they are too big to get this look. Whew! On to the manicure!
Microbeads vs. Seed Beads
As always, paint on your clear base coat.

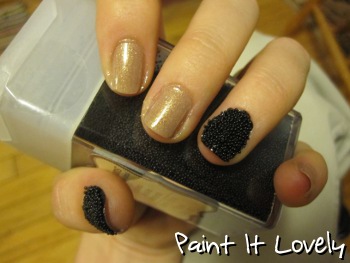
Next, paint your ring fingers and thumbs one coat of the black polish. Paint your other nails the champagne color. Depending on your polish, it may take more than one coat; mine took two. Let your nails dry.
  Once your nails have dried it is time to sprinkle on those microbeads. You are going to want to do this one nail at a time. The nail polish MUST be wet in order for the microbeads to stick to the polish. Repaint your first black nail, hold it over the paper bowl/plate, and sprinkle the beads over the top of the wet polish. Rotate your nail so that you get the beads on all sides. Gently press down on the beads to embed them into the polish better.
Repeat this for each of the other black polished nails. If you'd like you can paint over the beads with a clear top coat. I would do a thin coat because you don't want to get dried globs of polish on the beads.
Looks a lot like caviar, right? I have a feeling that this 3D manicure isn't too practical. I've only been wearing it for 15 minutes though and it still looks great. That may change by the time I wake up - I'll keep track of how long it lasts and post an update when I have a better idea.

I would love to see any recreations of this design, or if you tried something different. The next time I try this I want to use microbeads in a variety of colors over pink polish. Ice cream and sprinkles anyone?


read more

Monday, August 6, 2012

Popcorn Nails!

My husband and I have been watching a lot of movies and DVDs over this past weekend - due to our internet being out. It's working again for the time being; just decides to take a break every now and then. *eye roll*

Anyways, watching all of those movies inspired this manicure! I think it would also be great if you are going a fair or carnival.

You can paint all of your nails with this design, or like I did here - just painting it on your thumb and ring finger as "accent nails."

What you'll need:
  • clear polish (for your base and top coats)
  • white polish
  • red polish
  • light yellow polish
  • darker yellow polish
  • dotting tool (a toothpick works well too)
  • thin brush or striper
The colors I used:
  • Finger Paints "Paper Mache" (white)
  • CQ "Rouge"
  • Sinful Colors "Unicorn"
  • Sally Hansen Insta-Dri "Lightening"
As always, paint on that clear base coat to protect your nails.

You'll need to decide if you want the popcorn design on all of your nails, or just as an accent. If you want the design on all of your nails, paint all of your nails white. (Depending on your polish this may take two coats to be opaque.) If you are going to have the design as an accent, paint your ring fingers and thumbs white. Next, paint the other three fingers on each hand red. Like so.

Now you are going to need that striper, or thin brush, to paint vertical stripes on your white polished nails. Personally, this is the hardest part for me...especially on my right hang. Take your time and steady your painting hand on the table.
Once your stripes have dried it is time to put some popcorn on those nails. First, take your light yellow polish and use your dotting tool to put groups of three or four dots together. This is going to be the puffy part of the popcorn.
When those have dried use that dotting tool again to put a couple darker yellow dots in each popcorn piece. If you put them on different sides of the light yellow groups it looks like the popcorn is facing different directions.
Let that dry for a little bit, then use that clear polish to paint on a top coat. I prefer to use a fast-drying top coat with designs that are thicker - you'll notice that the popcorn dots are raised a little. I use Sally Hansen's Insta-Dri top coat, but Seche Vite is a very popular one...I like Sally Hansen's prices better. :)


I hope you enjoyed this one! It was a lot of fun to do.


read more

Tuesday, July 31, 2012

"Braided" nail polish

I got a lot of compliments over the weekend on this design. It looks really complex, but if you have ever braided someone's hair this will all seem pretty familiar.

For this design you are going to need three different colors and a clear coat, for your base and top coats. You don't need any special tools to achieve this look; however, you can use a toothpick to get any nail polish off of your skin around your nails.

From what I've heard in other tutorials for this design: you get the best results if you use one metallic, one pearlescent, and one neon color. You want the colors to be somewhat different, but they shouldn't clash.

I chose to use Nina Ultra Pro "Smoke-N-Mirrors" for my metallic, base coat. I also used Sally Hansen's HD "Resolution" and Finger Paints "Pop Art Purple." The purple color turned out much darker in the pictures and design - believe me this is a bright purple.

Start off by painting on your clear base coat.

Next, paint all of your nails with your metallic color. Depending on your polish you may need two coats. The polish should be opaque on your nails - you shouldn't be able to see your nail through it. I needed two coats of the "Smoke-N-Mirrors" color.

Here comes the fun part. Like I said earlier, it is just like braiding hair...at least the same pattern.

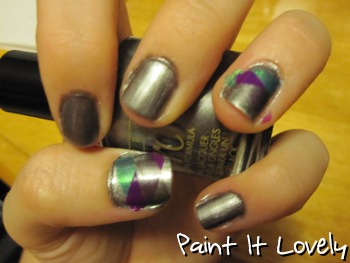
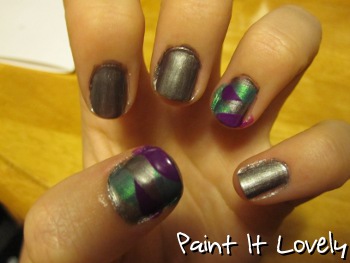
I chose to use the green "Resolution" color next. Make sure to get the excess polish off of the brush. Using the polish brush swipe a diagonal stripe across your nail, leave just a little bit of the metallic color showing at the top.
I chose to have them going the same direction on each hand so that every nail had a uniform look. Now you're going to take your next color, in my case "Pop Art Purple", and paint a diagonal stripe going the opposite direction.

Try to line the top of this stripe up with the bottom of the previous one. You'll do this for each stripe.

Now you'll use the metallic color and make a diagonal going in the opposite direction. Remember, it is like you are braiding.
You'll continue the pattern, rotating through the polishes in the same order.
Personally, I think it looks best with three stripes coming from each direction. The above picture is missing the final silver stripe.

I really like how this design turned out, and plan on trying it out with different color combos. Finish it off with your top coat and you're finished!


read more

Thursday, July 19, 2012

Cartoon Hearts

This one is pretty easy, and really cute! I've actually been wearing this design all week. It is a free-hand design, but nothing elaborate.

You will want to decide on two nail polish colors: one for the background and one for the hearts. I chose to use Wet-n-Wild's "I Need a Refresh-Mint" for the background color, and L.A. Colors BCC574 for the hearts.

Other supplies you'll need are:
  • clear base/top coat
  • black polish
  • white polish
  • thin brush (a toothpick will also work)
  • scrap paper, paper plate, or other similar object

Now, let's get down to business!


As always, paint on your clear base coat.

Next, paint on your background polish color.
 You're next step can be a little tricky. This is when you'll paint the hearts on your nails. I chose to do the hearts as kind of an accent (on two fingers per hand) instead of painting them on each finger. Do which ever you prefer.

The way that I painted the hearts on was to have a little extra polish on the brush and do a very rounded "V" shape that hung off the end of my nails. Here is a better view:
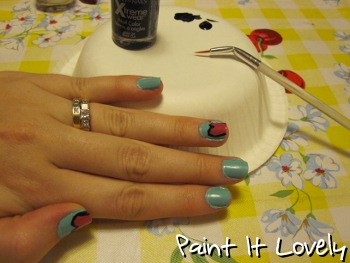
Next, you are going to put a drop or two of your black polish onto your paper plate. I used an upside down paper bowl. You are kind of using it as an artist's palette.


Dip your thin brush, or even a toothpick will work, into the black polish on your palette. Now, use the black polish to outline each of the hearts on your nails.

Now, to give your hearts a more cartoon-y look we are going to paint little highlights on them. Think of cartoon balloons - they usually have two white dots in top right/left to show where the light is hitting. Same idea here.
Add on that clear top coat and you're finished. Pretty cute, huh?

read more