I'd have to say that this is the most elaborate design I've done. Not that it was particularly difficult, but that it is technically five designs and took quite a bit of time.
I've always been a big Wizard of Oz fan...always. I love the movie, have the Barbie versions of Dorothy and her friends, a quilt, and let's just say that if I had it my way when I was younger my sister would have been named Dorothy (I was out voted...).
Anyways, for some reason I decided to use that movie as the theme for my nails this week. It was a pretty popular design. There were a lot of different ideas that I had, but I decided to go with pretty recognizable motifs from the movie.
If you're going to recreate this look here is what you'll need:
To start off, paint your thumbs yellow.
 Once the yellow polish has dried, use your striping brush and the darker yellow polishes to create brick lines. Basically, draw a few vertical lines then stagger small horizontal connector lines. This will be your yellow brick road.
 Next, paint your index (aka "pointer") and ring fingers white. Let those dry. We're going to paint those index fingers first. Using that striping brush, which you cleaned off with acetone, paint horizontal black lines over the white polish - this gives you the Wicked Witch of the East's socks.
 Your middle fingers are going to be painted as if they are the ruby red slippers. First, paint on that plain red polish.
 After it has dried, paint the red glitter polish on. You can't really tell here - but this is glittery.
 Your ring fingers are going to be painted up like Dorothy's dress. Using that cleaned up striping brush and the light blue polish, paint a grid of thin lines over the white polish on your ring fingers.
 Finally, your pinkies are going to be the Tin Man's chest. Paint on your silver polish first.
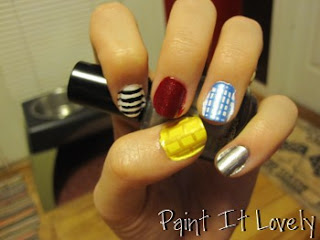 Use your striping brush and black polish to paint a vertical line down the center of the silver polish. You can also use the tip of the striping brush to put three small dots for rivets.
 Clean up your striping brush. We're going to use it along with that red polish to paint a small heart on the left side of the vertical line. After all, the Tin Man wanted a heart.
 There you have it. A Wonderful Wizard of Oz manicure!
If you opted to use that fine point sharpie here is where it comes in. You can use it to write on the yellow brick road. I wrote "No place like home..." on my thumb nail. It was tricky and I recommend clear polish over the sharpie...otherwise it rubs off. Turns out sharpies aren't' permanent on nail polish.
read more
I've always been a big Wizard of Oz fan...always. I love the movie, have the Barbie versions of Dorothy and her friends, a quilt, and let's just say that if I had it my way when I was younger my sister would have been named Dorothy (I was out voted...).
Anyways, for some reason I decided to use that movie as the theme for my nails this week. It was a pretty popular design. There were a lot of different ideas that I had, but I decided to go with pretty recognizable motifs from the movie.
If you're going to recreate this look here is what you'll need:
- two yellow polishes (one darker than the other)
- black polish
- white polish
- red polish
- red glitter polish
- light blue polish or striper
- silver polish
- striping brush
- fine point sharpie (this part is definitely optional)
- acetone or nail polish remover

- Sally Hansen "Lightening"
- SoEasy Gold Striper
- Finger Paints "Paper Mache"
- Finger Paints "Black Expressionism"
- CQ "Rouge"
- Finger Paints "Romanticism Ruby"
- SoEasy Light Blue Striper
- Nina Ultra Pro "Smoke-n-Mirrors"
To start off, paint your thumbs yellow.


 |
| Thumb to Pinky: Yellow Brick Road, Witch's socks, Ruby Slippers, Dorothy's dress, Tin Man |