Monday, August 6, 2012

Popcorn Nails!

My husband and I have been watching a lot of movies and DVDs over this past weekend - due to our internet being out. It's working again for the time being; just decides to take a break every now and then. *eye roll*

Anyways, watching all of those movies inspired this manicure! I think it would also be great if you are going a fair or carnival.

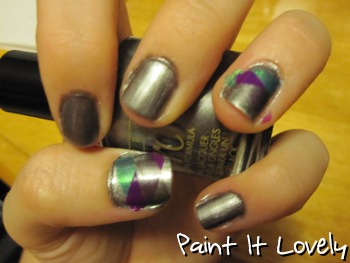
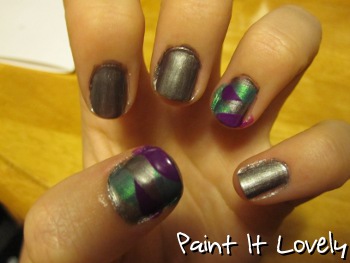
You can paint all of your nails with this design, or like I did here - just painting it on your thumb and ring finger as "accent nails."

What you'll need:
  • clear polish (for your base and top coats)
  • white polish
  • red polish
  • light yellow polish
  • darker yellow polish
  • dotting tool (a toothpick works well too)
  • thin brush or striper
The colors I used:
  • Finger Paints "Paper Mache" (white)
  • CQ "Rouge"
  • Sinful Colors "Unicorn"
  • Sally Hansen Insta-Dri "Lightening"
As always, paint on that clear base coat to protect your nails.

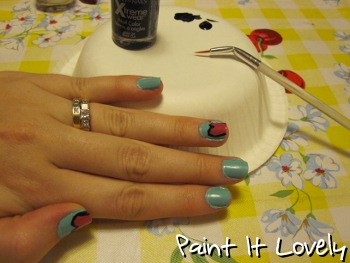
You'll need to decide if you want the popcorn design on all of your nails, or just as an accent. If you want the design on all of your nails, paint all of your nails white. (Depending on your polish this may take two coats to be opaque.) If you are going to have the design as an accent, paint your ring fingers and thumbs white. Next, paint the other three fingers on each hand red. Like so.

Now you are going to need that striper, or thin brush, to paint vertical stripes on your white polished nails. Personally, this is the hardest part for me...especially on my right hang. Take your time and steady your painting hand on the table.
Once your stripes have dried it is time to put some popcorn on those nails. First, take your light yellow polish and use your dotting tool to put groups of three or four dots together. This is going to be the puffy part of the popcorn.
When those have dried use that dotting tool again to put a couple darker yellow dots in each popcorn piece. If you put them on different sides of the light yellow groups it looks like the popcorn is facing different directions.
Let that dry for a little bit, then use that clear polish to paint on a top coat. I prefer to use a fast-drying top coat with designs that are thicker - you'll notice that the popcorn dots are raised a little. I use Sally Hansen's Insta-Dri top coat, but Seche Vite is a very popular one...I like Sally Hansen's prices better. :)


I hope you enjoyed this one! It was a lot of fun to do.


read more

Tuesday, July 31, 2012

"Braided" nail polish

I got a lot of compliments over the weekend on this design. It looks really complex, but if you have ever braided someone's hair this will all seem pretty familiar.

For this design you are going to need three different colors and a clear coat, for your base and top coats. You don't need any special tools to achieve this look; however, you can use a toothpick to get any nail polish off of your skin around your nails.

From what I've heard in other tutorials for this design: you get the best results if you use one metallic, one pearlescent, and one neon color. You want the colors to be somewhat different, but they shouldn't clash.

I chose to use Nina Ultra Pro "Smoke-N-Mirrors" for my metallic, base coat. I also used Sally Hansen's HD "Resolution" and Finger Paints "Pop Art Purple." The purple color turned out much darker in the pictures and design - believe me this is a bright purple.

Start off by painting on your clear base coat.

Next, paint all of your nails with your metallic color. Depending on your polish you may need two coats. The polish should be opaque on your nails - you shouldn't be able to see your nail through it. I needed two coats of the "Smoke-N-Mirrors" color.

Here comes the fun part. Like I said earlier, it is just like braiding hair...at least the same pattern.

I chose to use the green "Resolution" color next. Make sure to get the excess polish off of the brush. Using the polish brush swipe a diagonal stripe across your nail, leave just a little bit of the metallic color showing at the top.
I chose to have them going the same direction on each hand so that every nail had a uniform look. Now you're going to take your next color, in my case "Pop Art Purple", and paint a diagonal stripe going the opposite direction.

Try to line the top of this stripe up with the bottom of the previous one. You'll do this for each stripe.

Now you'll use the metallic color and make a diagonal going in the opposite direction. Remember, it is like you are braiding.
You'll continue the pattern, rotating through the polishes in the same order.
Personally, I think it looks best with three stripes coming from each direction. The above picture is missing the final silver stripe.

I really like how this design turned out, and plan on trying it out with different color combos. Finish it off with your top coat and you're finished!


read more

Thursday, July 19, 2012

Cartoon Hearts

This one is pretty easy, and really cute! I've actually been wearing this design all week. It is a free-hand design, but nothing elaborate.

You will want to decide on two nail polish colors: one for the background and one for the hearts. I chose to use Wet-n-Wild's "I Need a Refresh-Mint" for the background color, and L.A. Colors BCC574 for the hearts.

Other supplies you'll need are:
  • clear base/top coat
  • black polish
  • white polish
  • thin brush (a toothpick will also work)
  • scrap paper, paper plate, or other similar object

Now, let's get down to business!


As always, paint on your clear base coat.

Next, paint on your background polish color.
 You're next step can be a little tricky. This is when you'll paint the hearts on your nails. I chose to do the hearts as kind of an accent (on two fingers per hand) instead of painting them on each finger. Do which ever you prefer.

The way that I painted the hearts on was to have a little extra polish on the brush and do a very rounded "V" shape that hung off the end of my nails. Here is a better view:
Next, you are going to put a drop or two of your black polish onto your paper plate. I used an upside down paper bowl. You are kind of using it as an artist's palette.


Dip your thin brush, or even a toothpick will work, into the black polish on your palette. Now, use the black polish to outline each of the hearts on your nails.

Now, to give your hearts a more cartoon-y look we are going to paint little highlights on them. Think of cartoon balloons - they usually have two white dots in top right/left to show where the light is hitting. Same idea here.
Add on that clear top coat and you're finished. Pretty cute, huh?

read more

Triangle Tape Manicure

I was a slacker last week and didn't post anything...so this tonight I'm posting at least two tutorials. Yay!

Anyways, tape is an excellent tool to use with nail art. It gives you straight, crisp lines - which if you don't have a steady hand makes it very helpful. This tutorial will show you one way you can use tape to create a very simple nail art design.

What you'll need:
  • a clear base/top coat
  • two colors of nail polish
  • scotch tape
The colors I chose to use were both from Mary Kay Cosmetics: Plush Plum and Crushed Pearl. I wanted to try these colors because they were a birthday gift from my family and I thought they complemented each other well.


Decide which will be the base color and which will be the triangle tip on your nails.
First, paint your nails with your base coat. This helps protect your nail and prevent staining.

Next, you'll paint your nails with the color you chose for the base. I went with Plush Plum for the base color.

When that coat is completely dried you can move on to the next step. If the polish is not dried, the tape will peel it up and smear it very badly.

So, once it's dry you are going to take small pieces of scotch tape and lay out the design for your nail. Like so:

You can tape all of your nails or do them one by one. Which ever is easier for you. I tend to tape one hand, paint it, let it dry, remove the tape, then repeat with my other hand.


Next, you are going to paint the exposed part of your nail with your second polish color - in my case that was the Crushed Pearl color.
 Once your second color has completely dried, you will remove the tape from your finger nails. Peel it off slowly because some of the polish will have dried on the tape. You don't want to rip it off and end up peeling up part of your design.

Ta-da! You should have something like this.
Paint on your top coat to seal in your design and help prevent chipping - and you're done!

read more

Thursday, July 5, 2012

Birthday Candles!

So, in celebration of my birthday (tomorrow!) I decided to do a birthday themed design. Birthday candles could be used for any birthday (one idea was to do "24"s all over in different colors). They're easy too!

You'll need a pretty good variety of nail polish colors for this design. It's supposed to look festive!

Here is what I used:
  • a clear base coat
  • a blue polish (Sinful Colors "Why Not")
  • a purple polish (Sally Hansen Xtreme Wear "Deep Purple")
  • a white striper or polish
  • nail polish for the candles
  • yellow polish for the flames
  • a clear top coat
If you don't have stripers you can use a thin paintbrush or toothpick to draw the stripes and flames.

Let's get started!

First, paint your nails with your base coat. This will help protect your nail and prevent staining from your polishes.

Next, paint all of your nails the background color - I chose blue.

Take your accent color - mine was purple - and paint a diagonal section on your pointer and ring fingers. I did mine going in opposite directions. It doesn't have to be a perfectly straight line...you're going to cover the meeting point up.
Next, use colors you chose for your candles. You can put as many candles as you want on each nail. Just paint a straight line, from the middle of your nail to the tip, for each candlestick.
Here is a closer view:
Here's where the little details come in. Use your white striper (or other tool) to cover that diagonal meeting point. Also, paint little white stripes going down each candle at a diagonal.
Almost done. Now use a little bit of yellow polish to paint a flame at the top of each of your candles.

Cute, huh?! All that's left to do now is paint on a top coat to protect your design.


read more

Tuesday, July 3, 2012

July 4th Nails

 
So, here is my first attempt at a tutorial. I hope to eventually do video tutorials, but that will take some trying things out.

This design is really easy to do and you don't need any special tools or anything, although it does help to have a thin brush or striper for the white stripes.


What you will need is:

- clear base coat/top coat
- white polish
- blue polish
- red polish
- white striper (optional)

The colors/brands I used are, and the order is:
  • Yellow Stopper base coat
  • Sally Hansen Xtreme Wear "White On"
  • Santee "Neon Sapphire"
  • CQ "Rouge"
  • SoEasy Stripe Right (it's a silvery white)
  • Sally Hansen Diamond Strength Hardener
1.  Paint your nails with a base coat to protect your nails.

2. (optional) The only reason I painted my nails white first is because it helps the blue show brighter. So, depending on your blue polish, you may be able to skip this step. Anyways, paint your nails white...if needed.


3.  Paint all of your nails blue.


4.  Next, use your red polish and paint the first half of your nails red.


5.  Use your white polish, or striper, to paint a couple of white strips over the red portion of your nails. I suggest painting one stripe where the blue and red meet, to cover any uneven lines.


6.  Finally, paint your nails with a top coat to protect your design. The last step is to clean up around the edge of your nails. You can do this part with a cotton swab and nail polish remover.


Yay! That's it for my first tutorial. Like I said, I hope to switch to video tutorials in the near future.

Please leave any comments below. I'd love to hear your thoughts!
read more

Monday, July 2, 2012

Why nail art?

It may seem strange to some that I decided to start a blog about nail art. Nail art has become pretty fashionable lately. Lots of celebrities have been spotted showing off their nail art and people everywhere are jumping on the trend.

Fergie
Lady Gaga

Beyonce
However, the reason I took up nail art is not for fashion. Anyone who has been around me knows that I'm a jeans and t-shirt kind of girl. I hardly ever wear anything flashy...except for my nails. They are almost always painted up with some sort of design.

I used to bite my nails really bad. I mean, it was awful.

Yikes! Look at those nails!

I had tried everything I could think of to stop biting them, but I would do it without even realizing it.

One night I saw a  picture of a nail design one of my Facebook friends had tried. It was water marbling and I thought it looked awesome. So, I tried it myself. Pretty soon I was trying different designs two or three times a week. Long story short - that's when I stopped biting my nails.

My first nail design. Water marbling.

read more