Sunday, September 16, 2012

City Lights

I painted this design earlier last week, but haven't put the tutorial up until now because of long work days, a lack of sleep, and migraine headaches. Fun stuff. Anyways, I really like how this turned out and got a lot of compliments on the design. It was somewhat inspired by 9/11 and the really pretty sunsets we've been having around here lately. I love the colors of sunsets!

What you're going to need:
  • clear polish (for that base and top coat)
  • white polish
  • blue polish
  • purple polish
  • black polish
  • yellow polish
  • striping brush
  • dotting tool
  • make-up sponge
  • nail polish remover/acetone
This tutorial incorporates a technique that I haven't shown on here before - sponging to get a gradient effect. A sponged gradient is a good way to get a smooth transition from one color to another. In this case, we're transitioning from blue to purple - think sunsets people.

First off, paint on that base coat to protect your natural nails. I tried a new base coat this time and I must say that I was quite pleased. This base coat, Orly's Bonder, is an adhesive base coat which helps the polish stick to your nails better. This is especially important in nail art because you usually have quite a few layers of polish on. My designs usually last a day or two before they start chipping or peeling off - this design lasted almost a whole week! I was so pleased with this base coat...
 Next, paint all of your nails white. This is going to help our sponged colors show up better on your nails. I used Finger Paint's "Paper Mache".
Now we're going to use that make-up sponge. Using one of the flat sides, paint your blue and purple polishes side by side. It needs to be painted on wide enough to cover your nail.
Once you've got your polish on we're going to lightly sponge it onto each of your nails. The two colors I used were Sinful Color's "Why Not" (blue) and Orly's "You're Blushing" (purple). You'll want the purple near the tip of your nails. Again, we're going for a sunset look so you could probably even use pink or orange here if you wanted a different look. I suggest repainting your make-up sponge between each nail so that you will have the same look for each nail.

After sponging your nails, apply a clear top coat to help smooth the color transition. I also used a new top coat on this manicure and am in love with it also. I used Seche Vite's Dry Fast Top Coat. It smells like straight spray paint, but works wonderfully. It is definitely the fastest drying top coat I've used and didn't cause any shrinkage of the nail polish on my nails.It gives an awesome shine too.

Next we are going to paint on the outlines of the buildings. You'll want to make them different heights to create a city skyline look. You could probably skip this step, but I think that if you use a regular polish brush the buildings will have a rounded look instead of square corners. Use that striper or striping brush with black polish to create the outlines. I used Finger Paint's "Black Expressionism". I used the striping brush to add little lightening rods to some of the taller buildings.
Now you can use the regular polish brush to fill in the lines.
The last part of the design is to use your dotting tool and yellow polish to create little lighted windows on your buildings. I used Sinful Color's "Unicorn" yellow polish.
I added a small crescent moon to each of my thumbs to show that it was night time, but that is completely optional...and also really cute I think. Paint on a clear top coat, and your done!



read more

China Glaze - Deviantly Daring


Image taken from the China Glaze website
So, for my first nail polish review I decided to review a polish that I recently bought. It is from one of China Glaze's newest collections - the Bohemian Luster Chrome collection. I must say that these polishes are gorgeous, but I decided to only get one to start with. After seeing how well this polish covers the nail (with only one coat!) I'm probably going to get a couple more.

I must say - these photos don't do the color of this polish justice. For some reason I couldn't get the shininess of the polish to show in pictures. The color is gorgeous - it's a metallic turquoise blue color that I absolutely loved.

As I said earlier, the coverage this polish has is awesome! The photo I included is just one coat of Deviantly Daring and it was very opaque. I hadn't used a chrome polish in years and I must say that this was a good re-introduction to chrome polishes.

Enjoy the photos...


read more

Saturday, September 1, 2012

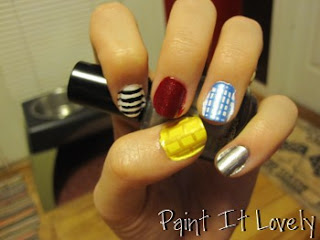
The Wonderful Wizard of Oz

I'd have to say that this is the most elaborate design I've done. Not that it was particularly difficult, but that it is technically five designs and took quite a bit of time.

I've always been a big Wizard of Oz fan...always. I love the movie, have the Barbie versions of Dorothy and her friends, a quilt, and let's just say that if I had it my way when I was younger my sister would have been named Dorothy (I was out voted...).

Anyways, for some reason I decided to use that movie as the theme for my nails this week. It was a pretty popular design. There were a lot of different ideas that I had, but I decided to go with pretty recognizable motifs from the movie.

If you're going to recreate this look here is what you'll need:
  • two yellow polishes (one darker than the other)
  •  black polish
  • white polish
  • red polish
  • red glitter polish
  • light blue polish or striper
  • silver polish
  • striping brush
  • fine point sharpie (this part is definitely optional)
  • acetone or nail polish remover
Polishes I used:
  • Sally Hansen "Lightening"
  • SoEasy Gold Striper
  • Finger Paints "Paper Mache"
  • Finger Paints "Black Expressionism"
  • CQ "Rouge"
  • Finger Paints "Romanticism Ruby"
  • SoEasy Light Blue Striper
  • Nina Ultra Pro "Smoke-n-Mirrors"

To start off, paint your thumbs yellow.
Once the yellow polish has dried, use your striping brush and the darker yellow polishes to create brick lines. Basically, draw a few vertical lines then stagger small horizontal connector lines. This will be your yellow brick road.
 Next, paint your index (aka "pointer") and ring fingers white. Let those dry. We're going to paint those index fingers first. Using that striping brush, which you cleaned off with acetone, paint horizontal black lines over the white polish - this gives you the Wicked Witch of the East's socks.
Your middle fingers are going to be painted as if they are the ruby red slippers. First, paint on that plain red polish.
After it has dried, paint the red glitter polish on. You can't really tell here - but this is glittery.
 Your ring fingers are going to be painted up like Dorothy's dress. Using that cleaned up striping brush and the light blue polish, paint a grid of thin lines over the white polish on your ring fingers.
Finally, your pinkies are going to be the Tin Man's chest. Paint on your silver polish first.
Use your striping brush and black polish to paint a vertical line down the center of the silver polish. You can also use the tip of the striping brush to put three small dots for rivets.
Clean up your striping brush. We're going to use it along with that red polish to paint a small heart on the left side of the vertical line. After all, the Tin Man wanted a heart.
There you have it. A Wonderful Wizard of Oz manicure!
Thumb to Pinky: Yellow Brick Road, Witch's socks, Ruby Slippers, Dorothy's dress, Tin Man
If you opted to use that fine point sharpie here is where it comes in. You can use it to write on the yellow brick road. I wrote "No place like home..." on my thumb nail. It was tricky and I recommend clear polish over the sharpie...otherwise it rubs off. Turns out sharpies aren't' permanent on nail polish.


read more