Thursday, October 11, 2012

Lace Overlay

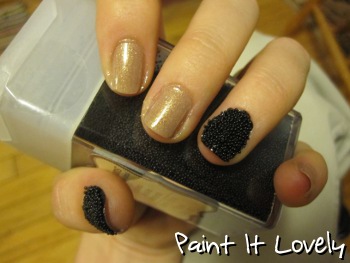
This is an awesome, and pretty sexy, look that it really easy to accomplish. I made these nails for my little sister to wear to her Homecoming Dance. I was so excited to do these! Her dress was black lace and her heels were black with a little gold. These were perfect!

The nice thing with this design is that there can be so many different looks. You can change the base color, the lace color, and the lace pattern. For this manicure I used Finger Paint's "Key to my Art" as the base color. It's a really shimmery gold and looks lovely with the black against it. I got the lace for pretty cheap at Joann's Fabric Store (especially using that 40% off coupon).

What you'll need:
  • base color
  • clear polish
  • lace
  • scissors
 In preparation for this manicure, I cut 10 small strips of lace that were wide enough to cover the whole nail.

The first step is to paint all of your nails with your base color. These pictures show the nails glued onto a wooden dowel because I was painting a set of fake nails for my sister.
In order to get the lace to stick to your nails you'll need to put a coat of clear polish over your colored polish. While the clear polish is still wet, place a strip of lace over your nail. Gently press it down with the tip of your finger. It's okay if it smudges the clear polish a little bit - you're going to paint another couple of clear coats over the top of the lace to smooth things out.
The final step is to use your scissors to cut the excess lace from around your nails. Take your time and be careful on this step. It is easier if you use small scissors - nail scissors are perfect!

Voila! You've got a lovely manicure that didn't take forever to achieve a detailed look (and that took no artistic talent at all).
read more

I'm back!

Sorry for the brief hiatus everyone! I had to lay off the nail art for a little bit because my migraine headaches were getting stronger and becoming more frequent. My husband and I wondered if maybe the fumes were causing them. Don't think it was the cause, but either way - nail polish and acetone fumes do NOT help a headache in any way.
read more

Sunday, September 16, 2012

City Lights

I painted this design earlier last week, but haven't put the tutorial up until now because of long work days, a lack of sleep, and migraine headaches. Fun stuff. Anyways, I really like how this turned out and got a lot of compliments on the design. It was somewhat inspired by 9/11 and the really pretty sunsets we've been having around here lately. I love the colors of sunsets!

What you're going to need:
  • clear polish (for that base and top coat)
  • white polish
  • blue polish
  • purple polish
  • black polish
  • yellow polish
  • striping brush
  • dotting tool
  • make-up sponge
  • nail polish remover/acetone
This tutorial incorporates a technique that I haven't shown on here before - sponging to get a gradient effect. A sponged gradient is a good way to get a smooth transition from one color to another. In this case, we're transitioning from blue to purple - think sunsets people.

First off, paint on that base coat to protect your natural nails. I tried a new base coat this time and I must say that I was quite pleased. This base coat, Orly's Bonder, is an adhesive base coat which helps the polish stick to your nails better. This is especially important in nail art because you usually have quite a few layers of polish on. My designs usually last a day or two before they start chipping or peeling off - this design lasted almost a whole week! I was so pleased with this base coat...
 Next, paint all of your nails white. This is going to help our sponged colors show up better on your nails. I used Finger Paint's "Paper Mache".
Now we're going to use that make-up sponge. Using one of the flat sides, paint your blue and purple polishes side by side. It needs to be painted on wide enough to cover your nail.
Once you've got your polish on we're going to lightly sponge it onto each of your nails. The two colors I used were Sinful Color's "Why Not" (blue) and Orly's "You're Blushing" (purple). You'll want the purple near the tip of your nails. Again, we're going for a sunset look so you could probably even use pink or orange here if you wanted a different look. I suggest repainting your make-up sponge between each nail so that you will have the same look for each nail.

After sponging your nails, apply a clear top coat to help smooth the color transition. I also used a new top coat on this manicure and am in love with it also. I used Seche Vite's Dry Fast Top Coat. It smells like straight spray paint, but works wonderfully. It is definitely the fastest drying top coat I've used and didn't cause any shrinkage of the nail polish on my nails.It gives an awesome shine too.

Next we are going to paint on the outlines of the buildings. You'll want to make them different heights to create a city skyline look. You could probably skip this step, but I think that if you use a regular polish brush the buildings will have a rounded look instead of square corners. Use that striper or striping brush with black polish to create the outlines. I used Finger Paint's "Black Expressionism". I used the striping brush to add little lightening rods to some of the taller buildings.
Now you can use the regular polish brush to fill in the lines.
The last part of the design is to use your dotting tool and yellow polish to create little lighted windows on your buildings. I used Sinful Color's "Unicorn" yellow polish.
I added a small crescent moon to each of my thumbs to show that it was night time, but that is completely optional...and also really cute I think. Paint on a clear top coat, and your done!


read more

China Glaze - Deviantly Daring


Image taken from the China Glaze website
So, for my first nail polish review I decided to review a polish that I recently bought. It is from one of China Glaze's newest collections - the Bohemian Luster Chrome collection. I must say that these polishes are gorgeous, but I decided to only get one to start with. After seeing how well this polish covers the nail (with only one coat!) I'm probably going to get a couple more.

I must say - these photos don't do the color of this polish justice. For some reason I couldn't get the shininess of the polish to show in pictures. The color is gorgeous - it's a metallic turquoise blue color that I absolutely loved.

As I said earlier, the coverage this polish has is awesome! The photo I included is just one coat of Deviantly Daring and it was very opaque. I hadn't used a chrome polish in years and I must say that this was a good re-introduction to chrome polishes.

Enjoy the photos...


read more

Saturday, September 1, 2012

The Wonderful Wizard of Oz

I'd have to say that this is the most elaborate design I've done. Not that it was particularly difficult, but that it is technically five designs and took quite a bit of time.

I've always been a big Wizard of Oz fan...always. I love the movie, have the Barbie versions of Dorothy and her friends, a quilt, and let's just say that if I had it my way when I was younger my sister would have been named Dorothy (I was out voted...).

Anyways, for some reason I decided to use that movie as the theme for my nails this week. It was a pretty popular design. There were a lot of different ideas that I had, but I decided to go with pretty recognizable motifs from the movie.

If you're going to recreate this look here is what you'll need:
  • two yellow polishes (one darker than the other)
  •  black polish
  • white polish
  • red polish
  • red glitter polish
  • light blue polish or striper
  • silver polish
  • striping brush
  • fine point sharpie (this part is definitely optional)
  • acetone or nail polish remover
Polishes I used:
  • Sally Hansen "Lightening"
  • SoEasy Gold Striper
  • Finger Paints "Paper Mache"
  • Finger Paints "Black Expressionism"
  • CQ "Rouge"
  • Finger Paints "Romanticism Ruby"
  • SoEasy Light Blue Striper
  • Nina Ultra Pro "Smoke-n-Mirrors"

To start off, paint your thumbs yellow.
Once the yellow polish has dried, use your striping brush and the darker yellow polishes to create brick lines. Basically, draw a few vertical lines then stagger small horizontal connector lines. This will be your yellow brick road.
 Next, paint your index (aka "pointer") and ring fingers white. Let those dry. We're going to paint those index fingers first. Using that striping brush, which you cleaned off with acetone, paint horizontal black lines over the white polish - this gives you the Wicked Witch of the East's socks.
Your middle fingers are going to be painted as if they are the ruby red slippers. First, paint on that plain red polish.
After it has dried, paint the red glitter polish on. You can't really tell here - but this is glittery.
 Your ring fingers are going to be painted up like Dorothy's dress. Using that cleaned up striping brush and the light blue polish, paint a grid of thin lines over the white polish on your ring fingers.
Finally, your pinkies are going to be the Tin Man's chest. Paint on your silver polish first.
Use your striping brush and black polish to paint a vertical line down the center of the silver polish. You can also use the tip of the striping brush to put three small dots for rivets.
Clean up your striping brush. We're going to use it along with that red polish to paint a small heart on the left side of the vertical line. After all, the Tin Man wanted a heart.
There you have it. A Wonderful Wizard of Oz manicure!
Thumb to Pinky: Yellow Brick Road, Witch's socks, Ruby Slippers, Dorothy's dress, Tin Man
If you opted to use that fine point sharpie here is where it comes in. You can use it to write on the yellow brick road. I wrote "No place like home..." on my thumb nail. It was tricky and I recommend clear polish over the sharpie...otherwise it rubs off. Turns out sharpies aren't' permanent on nail polish.


read more

Saturday, August 25, 2012

Marbling with Saran Wrap

Here's another design that a friend posted on my wall. This is a good one for anyone that has wanted to try water marbling, but doesn't want the hassle of taping your fingers and swirling polish on the water's surface.
This picture is not mine...I'm not sure who to credit it to.

I didn't take a picture of my supplies because you can use just about any polish colors that you'd like.

What you'll need:
  • clear polish
  • two contrasting colored polishes
  • saran wrap a.k.a. cling wrap
  • scissors
  • paper towel
-Prep work-
Before you start painting your nails I suggest getting your saran wrap ready. You will need a small, scrunched up piece for each nail. It's best to do this first because the saran wrap will lift any wet polish off of your nails.

 Start off by painting your nails with your clear polish.

Now, decide which color is going to be the base color. I chose to use Sally Hansen's "Blue Me Away!" as the base color. Paint all of your nails with your first color and allow them to dry completely.

The next part has to be done one nail at a time. You're going to paint your second color over the first one. I used Sally Hansen's "Lightening". You need to work quick here. Right after you paint a nail, take a piece of your pre-cut saran wrap and blot your nail just a couple of times.
Pre-blotting
Post-blotting
I know that it looks strange and not so great here...but it gets better. (This is the second time I've tried this design - I was less than pleased with the first attempt a few weeks ago.) Repeat the process of painting and blotting for each of your nails. Let that second color dry for a little bit, then paint on your clear top coat.

Voila! Marbled nails sans water.
This is a little bit messy to do. I used a few Q-Tips and acetone to clean up around each of my nails.

read more

Friday, August 24, 2012

Follow P.I.L

Guess what! You can now follow Paint It Lovely by e-mail. I realize that a lot of people don't use Google email or Blogger - so this is more for you folks.

There's a handy little section to the right of the blog. Type your email into that box and you'll be notified when the blog is updated. Yay!
read more

Friday, August 17, 2012

Mod Dots

This week one of my friends, Jessica (check out her Etsy store!), posted this picture on my Facebook wall. I thought it was a really cute design and wanted to try it out myself.
It's really simple and quick! Here's what you'll need:
  • clear polish
  • gray polish
  • black polish
  • blue polish
  • yellow polish
  • toothpicks or a dotting tool
  • paper plate or scrap paper
If you've been following along with the blog, you know what to do first. Paint on that clear base coat.

Next paint on one or two coats, depending on your polish, of your gray polish. Orly's "Faint of Heart" took two coats to get it where you couldn't see any streaks.
Orly's "Faint of Heart"
You'll be using your piece of paper or paper bowl as a palette. Put a dot or two of the black polish on your palette. Dip a toothpick into the polish and add a few dots, anywhere from four to seven, to the side of each nail. Make sure that they are all on the same side of your nails. Like this...
Finger Paints "Black Expressionism"
Place some blue polish on your palette. Using a new toothpick, do the same thing with your blue polish, only dab on fewer dots. Layer the blue dots on over the black dots.
Santee "Neon Sapphire"
Add some yellow polish to your palette. Use the smaller end of your toothpick to add a few yellow dots to each of your nails. The brighter the better. The yellow really pops against the darker colors.
Sally Hansen "Lightening"
 All that's left to do is paint on that clear top coat. I love how simple this design is and think it would look great with neon colors too. Have fun and try different color combos! Post your designs on the Facebook page!
read more

Wednesday, August 15, 2012

French with a Twist(er)

Earlier this week I was watching That 70's Show (love that show!) on NetFlix; in the episode I was watching Leo mentioned the game Twister. I thought this would be a fun twist on a french tip manicure, or it would look cute as a full nail design. The nice thing about it is that it's soooo easy!


For this design you are going to need:
  • clear coat (for the base and top coats)
  • white polish
  • red polish
  • blue polish
  • yellow polish
  • green polish
  • toothpicks (one for each color if possible) or a dotting tool
  • a palette (paper plate, piece of paper, etc.)

The polishes I used were:
  • Finger Paints "Paper Mache"
  • Santee "Neon Sapphire"
  • Wet n' Wild "Sage in the City"
  • CQ "Rouge"
  • Sally Hansen Insta-Dri "Lightening"
First things first - paint on that clear base coat. This will help protect your nails from staining.

Next, paint all of your nails white. Depending on your polish it may take more than one coat. I did two so that the polish was opaque (not see through).
The toothpicks I used are pointy on one end and blunt on the other. The blunt end makes a perfect dotting tool. If your toothpicks aren't make like this here is a secret. Dip the tip of the toothpick in a polish, then let it dry. Do this a couple of times until you get a bead of polish built up to the size you would like your dots to be.

I decided to do only a couple dots at a time of each color - that way the dots looked more random and layered. However, you could do all the blue dots at once, then the red, and so on. Also, I only did the tips of my nails. It was cute, but feel free to get creative!

Use your scrap paper or paper plate as a palette for your nail polish. I would only put a little bit on of each color at a time. That way it doesn't dry out and a bunch of polish goes to waste.  Like I said before, I alternated colors. The following pictures show how the look progressed. You can use any order of colors though.
That's it! It's simple, and it's quick! Paint on your top coat and you're good to go!


read more

Monday, August 13, 2012

Caviar Update

I got a lot of compliments and a lot of "what happened to your nails?!" comments on this manicure. It was fun to see people's different reactions. The manicure lasted me a little over 24 hours, however it could have lasted a lot longer if I didn't mess with it.

The reason I say that is because I have a really bad habit of messing with my nail polish. Once it starts to chip I tend to peel it off of my nails. >.< So, I blame myself for this manicure not lasting very long. This is one reason I have stayed away from textured manicures...my inability to leave them alone.
read more

Thursday, August 9, 2012

Champagne & Caviar

One of the latest trends in nail art is the Caviar manicure. The nail polish brand Ciate has announced the release of a kit containing everything you need to achieve this look. However, that kit comes with a hefty price tag of $25. That's pretty pricey, considering this look may not be for everyone - I honestly wasn't sure how I'd feel about it once I was wearing - and the fact that there is supposedly a waiting list for the before mentioned kit. Yikes!

The reason I say "yikes" is because I got the same look for $3.99, not counting the cost of polish which I already had. That's a big savings from the name brand kit, huh? The only thing I had to buy new were microbeads...which by the way are not the same as seed beads. More on that later.

I really like the look of this manicure, and there are so many different things you could do with it. For this tutorial I decided to do something matching the name "Caviar". Now, I've never had caviar - and I have no desire to try it. The one time I tried champagne I was not impressed at all...I'd rank it as one of the worst tasting things I've ever had. But, supposedly the two go well together...supposedly.

Let's get to it!

Supplies:
  • clear base & top coat polishes
  • black polish
  • champagne colored polish
  • black microbeads
  • paper bowl or plate


I specifically used:
  •  Finger Paints "Black Expressionism"
  • China Glaze "Fast Track"
  • Recollections black microbeads
Again, microbeads are not the same as seed beads. Crafty people may already know this - I did not. Microbeads are not found in the jewelry section of the craft store...they are found in the scrapbooking section. Apparently they are a page "embellishment". So, don't get the seed beads because they are too big to get this look. Whew! On to the manicure!
Microbeads vs. Seed Beads
As always, paint on your clear base coat.

Next, paint your ring fingers and thumbs one coat of the black polish. Paint your other nails the champagne color. Depending on your polish, it may take more than one coat; mine took two. Let your nails dry.
  Once your nails have dried it is time to sprinkle on those microbeads. You are going to want to do this one nail at a time. The nail polish MUST be wet in order for the microbeads to stick to the polish. Repaint your first black nail, hold it over the paper bowl/plate, and sprinkle the beads over the top of the wet polish. Rotate your nail so that you get the beads on all sides. Gently press down on the beads to embed them into the polish better.
Repeat this for each of the other black polished nails. If you'd like you can paint over the beads with a clear top coat. I would do a thin coat because you don't want to get dried globs of polish on the beads.
Looks a lot like caviar, right? I have a feeling that this 3D manicure isn't too practical. I've only been wearing it for 15 minutes though and it still looks great. That may change by the time I wake up - I'll keep track of how long it lasts and post an update when I have a better idea.

I would love to see any recreations of this design, or if you tried something different. The next time I try this I want to use microbeads in a variety of colors over pink polish. Ice cream and sprinkles anyone?


read more